+++
title = "HAMnet on the pfSense"
summary = """A short guide on how I installed my L2TP tunnel on my
router/firewall. Routes get announced to new DHCP clients."""
date = "2022-11-21T20:13:08+01:00"
#lastmod = ""
categories = ["amateur-radio"]
tags = ["hamnet","pfSense","networking","linux"]
+++
The usual approach to connect your computer to the
HAMNET is to
create a VPN tunnel using
PPTP. Most of recent
operating systems stopped supporting this protocol because it is outdated and
insecure.
In my recent
[post about HAMNET]({{< ref "2022-10-16-vpn-tunnel-into-hamnet-on-fedora-36" >}})
I created an L2TP tunnel to the
german VPN Server at the RWTH Aachen University on my laptop. Routes have been
added manually---the network was only available on this particular computer.
No other device was able to connect to the HAMNET.
Now I made some changes to my home network where I finally was able to create
the tunnel on my main router/firewall.
## Creating a new PPP device
Select Interfaces → Assignments → PPPs

Click on the green + Add button on the bottom right and create the
new PPP interface with the following specs:
| Settings name | value |
| :--- | :--- |
| Link Type | **L2TP** |
| Link interface(s) | **WAN** |
| Username | **N0CALL** (your callsign usually) |
| Password | (your password) |
| Local IP | (leave empty) |
| Gateway IP or hostname | **vpn.afu.rwth-aachen.de** |

## Create a new L2TP device
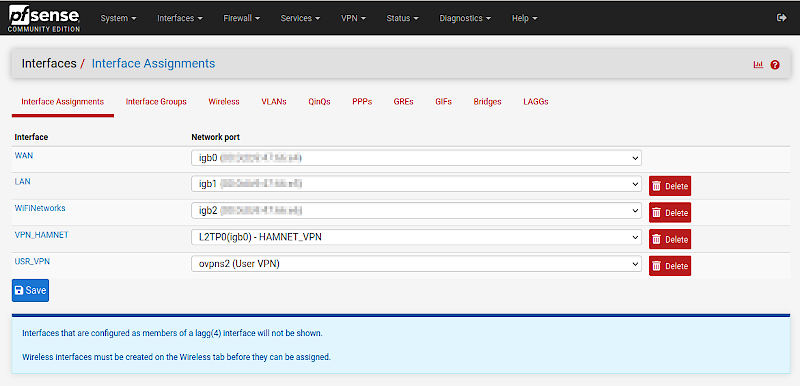
My screenshot looks a bit different because I have already assigned the
interface. You should see the option Available network ports in the
last row combined with a green + Add button on the right side (just
below the red buttons). Select the newly created L2TP interface (which should
look like `L2TP (igb0) - HAMNET_VPN` -- or something like that) and click the
green button.
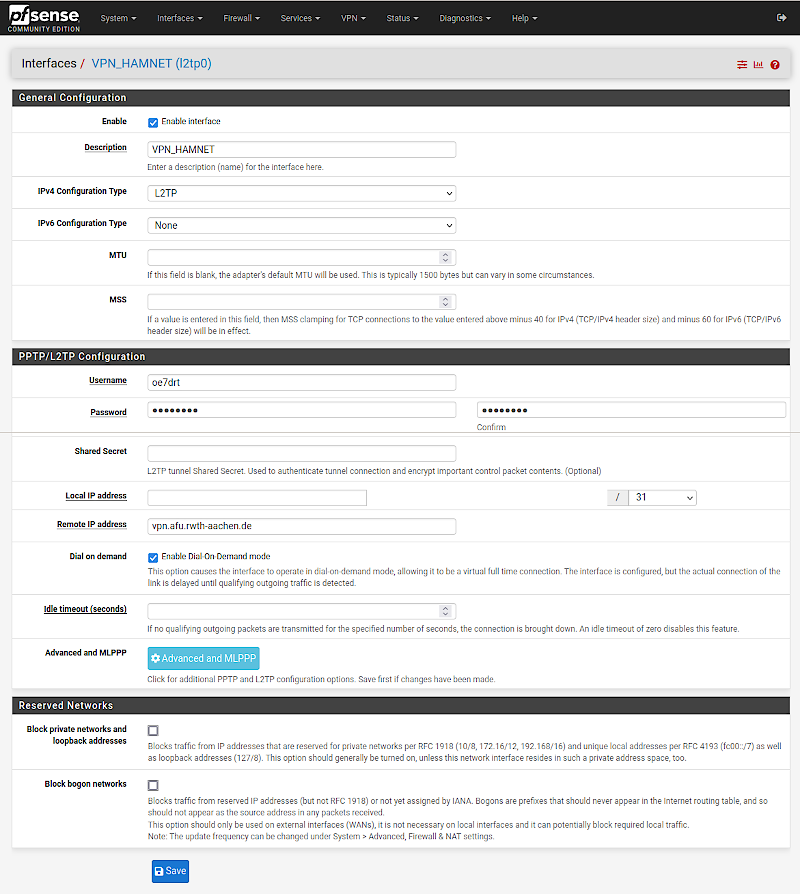
Then click on the new interface and set it up.
| Settings name | value |
| :--- | :--- |
| Description | **VPN_HAMNET** (a meaningful description) |
| IPv4 Configuration Type | **L2TP** |
| IPv6 Configuration Type | **None** (or SLAAC if you use IPv6) |
| Username | **N0CALL** (your callsign usually) |
| Password | (your password) |
| Remote IP address | **vpn.afu.rwth-aachen.de** |
## Add static routes on the firewall/router
Click on the green + Add button on the bottom right. Add the
networks `44.0.0.0/9` and `44.128.0.0/10` to the list; use the interface from
above as the gateway.

## The tunnel should be up and running
Go to Status → Gateways and look if it is online.

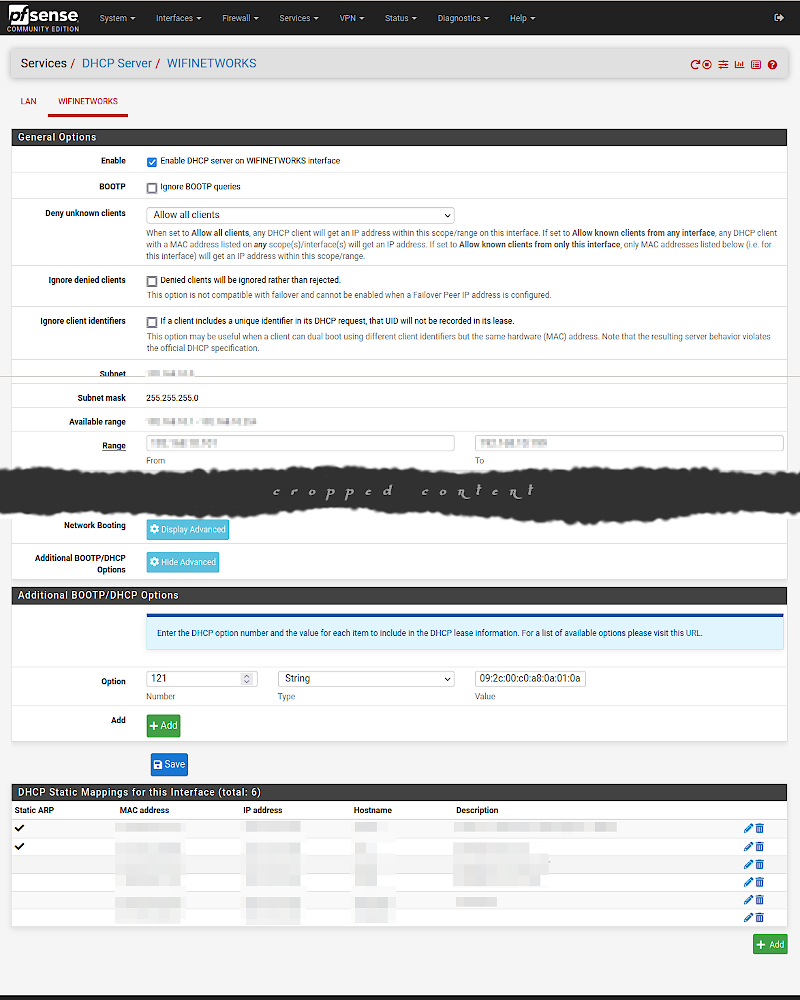
## Send this routing configuration to DHCP clients
We can send this configuration to DHCP clients when they get their IP address.
Go to Services → DHCP Server and select the interface
that you want to configure with these routes. Then scroll down to the section
Other Options and look for the last setting
Additional BOOTP/DHCP Options. Those settings are hidden per default,
so click on Display Advanced. Below you can now enter the additional
configuration.
You see three fields, Number, Type and Value.
| Number | Type | Value |
| :--- | :--- | :--- |
| `121` | `String` | `09:2c:00:c0:a8:0a:01:0a:2c:80:c0:a8:0a:01` |
{{< alert >}}
Do not copy this configuration into your pfSense. This setting is somewhat
encoded and routes the HAMNET IPs to my routers IP address. You have to create
your own configuration!
{{< /alert >}}
Create your own configuration with help of this script:
~~~bash
#!/bin/bash
check_ip(){
local n=0 val=1
for i in ${1//./ }; do
[ $i -lt 0 -o $i -gt 255 ] && val=0
n=$[n+1]
done
[ $n -ne 4 ] && val=0
if [ $val -ne 1 ] ; then
echo "Invalid IP: $1" >&2
exit 1
fi
}
to_bin(){
local BIN=({0..1}{0..1}{0..1}{0..1}{0..1}{0..1}{0..1}{0..1})
for i in ${1//./ }; do
echo -n ${BIN[$i]}
done
}
while [ $# -gt 0 ] ; do
nw=${1%/*}; nm=${1#*/}; gw=$2
check_ip $nw; check_ip $gw
if [ ${#nm} -gt 2 ] ; then
check_ip $nm
nmbin=$(to_bin $nm)
if echo $nmbin | grep -q "01" ; then
echo "Invalid netmask: $nm" >&2
exit 1
else
nmbin=${nmbin//0/}
fi
nm=${#nmbin}
echo $nm
fi
gwhex=$(printf "%02x:%02x:%02x:%02x" ${2//./ })
nwhex=$(printf "%02x:%02x:%02x:%02x" ${nw//./ })
nmhex=$(printf "%02x" ${nm//./ })
[ $nm -le 24 ] && nwhex=${nwhex%:*}
[ $nm -le 16 ] && nwhex=${nwhex%:*}
[ $nm -le 8 ] && nwhex=${nwhex%:*}
echo -n $nmhex:$nwhex:$gwhex
shift 2
[ $# -gt 0 ] && echo -n ":"
done
echo
~~~
Source: [mgergi.hu](https://mgergi.hu/en/it-blog/static-route-dhcp-pfsense)
Script was cited/hardcopied because I hate it when linked websites ain't
available any more. But there is a nice explanation on that website that
you should read.
Replace `192.168.10.1` with your routers IP address!
~~~console
$ hexroute.sh 44.0.0.0/9 192.168.10.1
09:2c:00:c0:a8:0a:01
$ hexroute.sh 44.128.0.0/10 192.168.10.1
0a:2c:80:c0:a8:0a:01
~~~
You see, you get two values. All you have to do is concatenate those two values
and separate them with colons. Insert the new string into the Value
field and save those options.
{{< alert >}}
**WARNING:** Not all clients will add both the default gateway and the classless
static routes as per [RFC 3442](https://www.rfc-editor.org/rfc/rfc3442.html#page-5)
clients must ignore the router option.
{{< /alert >}}
You will be fine if you use NetworkManager. Connections managed by NetworkManager
usually add the gateway and the classless static routes.
This is totally different on a Raspberry Pi. These do not use NetworkManager
(well, maybe they do when they run a desktop environment but not on console).
The best way (for me) was to ignore the static routes for my Raspberry Pis and
add the static routes manually.
In `/etc/dhcpcd.conf`, uncomment `classless_static_routes`:
~~~aconf {linenos=inline,linenostart=26,hl_lines=3}
# A list of options to request from the DHCP server.
#option domain_name_servers, domain_name, domain_search, host_name
#option classless_static_routes
# Respect the network MTU. This is applied to DHCP routes.
option interface_mtu
~~~
and let **dhcpcd** add the static routes automatically. Create the file
`/etc/dhcpcd.exit-hook` and add the routes manually with this script:
~~~bash
/sbin/route add -net 44.0.0.0/9 gw 192.168.10.1
/sbin/route add -net 44.128.0.0/10 gw 192.168.10.1
~~~
## More resources
* https://support.aa.net.uk/L2TP_Client:_pfSense
* https://id3145.com/2017/blog/5-pfSense-Add-Static-Routes-to-pfSense-DHCP-Clients.html
* https://www.iana.org/assignments/bootp-dhcp-parameters/
* https://www.rfc-editor.org/rfc/rfc3442.html