+++
title = "My current website setup"
summary = """This is how I install hugo nowadays. Although that routine might
change anytime."""
date = "2023-01-24T00:16:14+0100"
#lastmod = ""
categories = ["computerstuff"]
tags = ["linux", "gohugo", "reminders"]
draft = true
+++
I'll do a quick go-through of my actual website's installation procedure.
The website itself is hosted without my personal server---I'm using
Cloudflare for this to work. The content is saved in a Githubrepository
which gets then fetched from Cloudflare. After half a minute the website
is published and the website cache on Cloudflare gets cleared automatically
when I push new changes to the repository.
## Install hugo from source
### Requirements
- Install Git
Depending on your OS, this might look
like one of those:
~~~console
$ sudo apt install git
~~~
~~~console
$ sudo pacman -S git
~~~
- Install Go version 1.18 or later
See above for the syntax, this package may be called `golang` on some
distributions (I think Ubuntu/Debian for example).
- Update your PATH environment variable as described in the Go documentation
Now, that looks like this:
~~~zsh
if [[ -d $HOME/go ]]; then
export GOPATH="$HOME/go"
path=(
$GOPATH/bin
$path
)
fi
~~~
_That is an example taken from my `.zprofile` file._
### Install hugo
~~~console
$ go install -tags extended github.com/gohugoio/hugo@latest
~~~
That installs the latest version of hugo into `$HOME/go/bin`. If your terminal
does not recognize the new binaries: `hash -r` or `rehash` might help...
Source:
## Adding themes as hugo modules
Just to be more clear on this: I'm using the congo theme for hugo right here.
{{< alert >}}
Ensure you have Go and Hugo installed, and that you have created a new
hugo project before proceeding.
{{< /alert >}}
From your project directory, initialise hugo modules:
~~~console
$ hugo mod init github.com//
~~~
Create `config/_default/module.toml` and add the following:
~~~toml
[[imports]]
path = "github.com/jpanther/congo/v2"
~~~
Start your server using `hugo server` and the theme will be downloaded
automatically.
Remove the file `config.toml` from your website root directory (generaded by
`hugo site new...`). Copy the config files from the theme into `config/_default/`.
{{< alert >}}
Note: Do not overwrite the module.toml file you created above!
{{< /alert >}}
You will find these theme config files in the Hhgo cache directory, or download
[a copy from GitHub](https://github.com/jpanther/congo/tree/dev/config/_default).
Follow the [Getting Started instructions](https://jpanther.github.io/congo/docs/getting-started/)
to configure your website.
## Using Atom for feeds (replacing RSS)
Define an appropriate media type and corresponding output format in `config.toml`:
```toml
[mediaTypes]
[mediaTypes."application/atom"]
suffixes = ["xml"]
[outputFormats.Atom]
mediaType = "application/atom"
baseName = "index"
isPlainText = false
```
Tell hugo to produce the home page in Atom and HTML (and JSON) formats,
also append this in `config.toml`:
```toml
[outputs]
home = [ "HTML", "Atom", "JSON" ]
```
Put an `index.atom.xml` template file in your layouts directory. You can use the
attached one as a starting point, don't forget to edit the author element
appropriately or make it use the values from your config.
```xml
{{ with .Title }}{{.}} on {{ end }}{{ .Site.Title }}{{ .Date.Format "2006-01-02T15:04:05-0700" | safeHTML }}YOUR NAME HEREYOUR EMAIL ADDRESSDEFINITIVE URI OF YOUR WEB SITE{{ .Permalink }}
{{ range first 15 .Data.Pages }}
{{ .Title }}{{ .Permalink }}{{ .Date.Format "2006-01-02T15:04:05-0700" | safeHTML }}{{ .Lastmod.Format "2006-01-02T15:04:05-0700" | safeHTML }}{{ .Summary | html }}
{{ end }}
```
Source:
## Auto-clear cache on git push
### Requirements
- A **Cloudflare website** (not pages, well---yes, but a website that uses one
of your pages)
- An API token on Cloudflare to let git clear your website's cache (see below)
### Cloudflare setup
Create a file `.cloudflarerc` in your `$HOME` directory that contains those two
variables:
~~~bash
apikey=*********************************-******
id=********************************
~~~
You find them in your [Cloudflare dashboard](https://dash.cloudflare.com/).
Click on Websites and continue with clicking your domain name.
Scroll down a bit and find your `id` on the right sidebar. It is called
_Zonen-ID_ (within API). Below that is a link called _Ihr API-Token erhalten_.
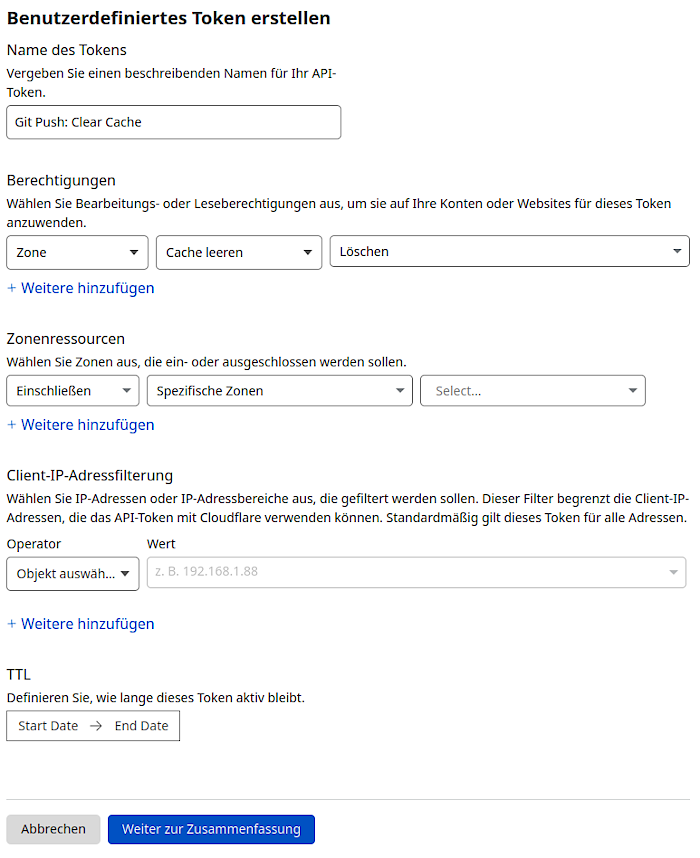
Click it and create a user-defined API token. I'll show you a screenshot of
mine, edit yours to fit this example.

Click Create token and copy the resulting token into your
`.cloudflarerc` file.
### git repository setup
Now we need one last file in our git repository. Create `.git/hooks/pre-push` and
fill it with this:
~~~bash
#!/bin/bash
if ! [ -f ~/.cloudflarerc ] ; then
echo "No ~/.cloudflarerc file found. Cloudflare clear cache SKIPPED."
exit 0
fi
. ~/.cloudflarerc
echo -n "Clearing cloudflare cache..."
ret="$(curl -s -X DELETE "https://api.cloudflare.com/client/v4/zones/$id/purge_cache" \
-H "Authorization: Bearer $apikey" \
-H "Content-Type: application/json" \
--data '{"purge_everything":true}')"
if [ -n "$(echo $ret | grep success)" ] ; then
echo " Success!"
else
echo " *** FAILED ***"
echo "Could not clear cloudflare's cache. Update will not proceed."
# exit with 1, so the update does not proceed, so we will know
exit 1
fi
~~~
I found the script on
---which is also a good read if my explanation won't work for you.
Don't forget to make this script executable:
~~~console
$ chmod +x .git/hooks/pre-push
~~~
Finished.